> For the complete documentation index, see [llms.txt](https://gitbook.com/docs/llms.txt). Markdown versions of documentation pages are available by appending `.md` to page URLs; this page is available as [Markdown](https://gitbook.com/docs/documentation/zh/chuang-jian-nei-rong/blocks/insert-images.md).

# 图片

您可以将图片插入到页面中，然后选择它们的大小，以及是否将它们左对齐、居中或右对齐。您还可以选择在图片块中包含替代文本和/或说明文字。

{% hint style="info" %}
**提示：** 出于无障碍考虑，我们建议为图片设置替代文本。
{% endhint %}

### 图片块示例 <a href="#example-of-an-image-block" id="example-of-an-image-block"></a>

<div align="center"><figure><img src="https://images.unsplash.com/photo-1446776709462-d6b525c57bd3?crop=entropy&#x26;cs=srgb&#x26;fm=jpg&#x26;ixid=M3wxOTcwMjR8MHwxfHNlYXJjaHwyfHxzcGFjZXxlbnwwfHx8fDE3MzMxOTY5NTR8MA&#x26;ixlib=rb-4.0.3&#x26;q=85" alt="A photograph taken from space looking back towards Earth. A satellite is in the foreground, and in the background is an ocean-covered part of our planet with patchy clouds."><figcaption><p>带说明文字的图片块示例</p></figcaption></figure></div>

### 上传图片

添加图片到内容中有两种方式：

1. 将文件管理系统中的图片直接拖放到页面上的一个空白块中。
2. [添加一个图片块](/docs/documentation/zh/chuang-jian-nei-rong/blocks.md#inserting-a-new-content-block) 到页面中，并使用 **选择图片** 出现在窗口右侧的侧边面板。

如果您采用第二种方式，可以选择上传文件、选择之前上传的文件、粘贴图片 URL，或者通过 [Unsplash](https://unsplash.com/) 使用内置搜索添加图片。

{% hint style="warning" %}
GitBook 允许您单个文件上传最大 100MB 的图片。
{% endhint %}

在一个章节中的资源总数没有固定限制，不过 GitBook 保留因滥用而封禁账户的权利。对于大于上传限制的文件，请将它们存储在 Google Drive 或 Dropbox 等服务中，并从页面链接到它们。

动图 gif 每个文件限制为 200 帧。大文件——包括 gif——会减慢页面加载速度，因此尽量避免直接上传大文件。

#### 创建图片画廊

在图片块中添加超过一张图片将创建一个画廊。要这样做，请打开该块的 **选项菜单** <picture><source srcset="/files/QLUQj6waZRiK6FpSqrt6" media="(prefers-color-scheme: dark)"><img src="/files/e1df373962dc4830bcb786d7e5cb3cce603367d3" alt="The Options menu icon in GitBook"></picture> 并选择 **添加图片…** 以再次打开 **选择图片** 侧边面板。

要从画廊中删除图片，请打开要删除的图片上的 **编辑菜单** <picture><source srcset="/files/kN09oTFtAuyaxNIwWuCt" media="(prefers-color-scheme: dark)"><img src="/files/ffffa8d3208c93af4ead7061897fa70e6d0d612f" alt=""></picture> 并按下 **删除 ⌫** 键。

### 添加浅色和深色模式图片 <a href="#light-and-dark-mode" id="light-and-dark-mode"></a>

您可以为已发布网站的浅色和深色模式版本设置不同的图片。GitBook 会根据访客所处的模式自动显示正确的图片。

要为深色模式添加图片，请将鼠标悬停在图片上，打开 **编辑菜单** <picture><source srcset="/files/kN09oTFtAuyaxNIwWuCt" media="(prefers-color-scheme: dark)"><img src="/files/ffffa8d3208c93af4ead7061897fa70e6d0d612f" alt=""></picture> 并点击 **替换图片** <picture><source srcset="/files/B8EhRVkFXw7nB8Q01UEZ" media="(prefers-color-scheme: dark)"><img src="/files/5f61065ea8397b18bcc03ce53855f0f34247a774" alt="The Replace image icon in GitBook"></picture>.

在下拉菜单中，选择 **为深色模式添加图片**。设置好后，您可以通过同一菜单替换任一图片。

{% hint style="warning" %}
**注意：** GitBook 目前不支持某些情况下的浅色和深色模式图片，包括页面封面或以下内容上的图片封面： [卡片](/docs/documentation/zh/chuang-jian-nei-rong/blocks/cards.md).
{% endhint %}

### 通过 GitHub/GitLab Sync 实现浅色和深色模式图片 <a href="#light-and-dark-mode-through-github-gitlab-sync" id="light-and-dark-mode-through-github-gitlab-sync"></a>

您也可以在 Markdown 中通过 HTML 语法（`<picture>` 并 `<source>`).

对于块图片，请使用 `<figure>` HTML 元素，并在其中使用 `<picture>` 并 `<source>` ：

```html
图片前的文本

<figure>
  <picture>
    <source
      srcset="
        https://user-images.githubusercontent.com/3369400/139447912-e0f43f33-6d9f-45f8-be46-2df5bbc91289.png
      "
      media="(prefers-color-scheme: dark)"
    />
    <img
      src="https://user-images.githubusercontent.com/3369400/139448065-39a229ba-4b06-434b-bc67-616e2ed80c8f.png"
      alt="GitHub 标志"
    />
  </picture>
  <figcaption>说明文字</figcaption>
</figure>

图片后的文本
```

对于行内图片（与文本并排显示的图片），请使用 `<picture>` HTML 元素，并在其中使用 `<source>` ：

```html
图片前的文本
<picture
  ><source
    srcset="
      https://user-images.githubusercontent.com/3369400/139447912-e0f43f33-6d9f-45f8-be46-2df5bbc91289.png
    "
    media="(prefers-color-scheme: dark)" />
  <img
    src="https://user-images.githubusercontent.com/3369400/139448065-39a229ba-4b06-434b-bc67-616e2ed80c8f.png"
    alt="GitHub 标志"
 /></picture>
以及图片后的文本
```

{% hint style="warning" %}
**注意：** 我们目前还不支持 [仅限 GitHub 的语法](https://github.blog/changelog/2021-11-24-specify-theme-context-for-images-in-markdown/) 通过 `#gh-dark-mode-only` 或者 `#gh-light-mode-only`.
{% endhint %}

### 调整大小

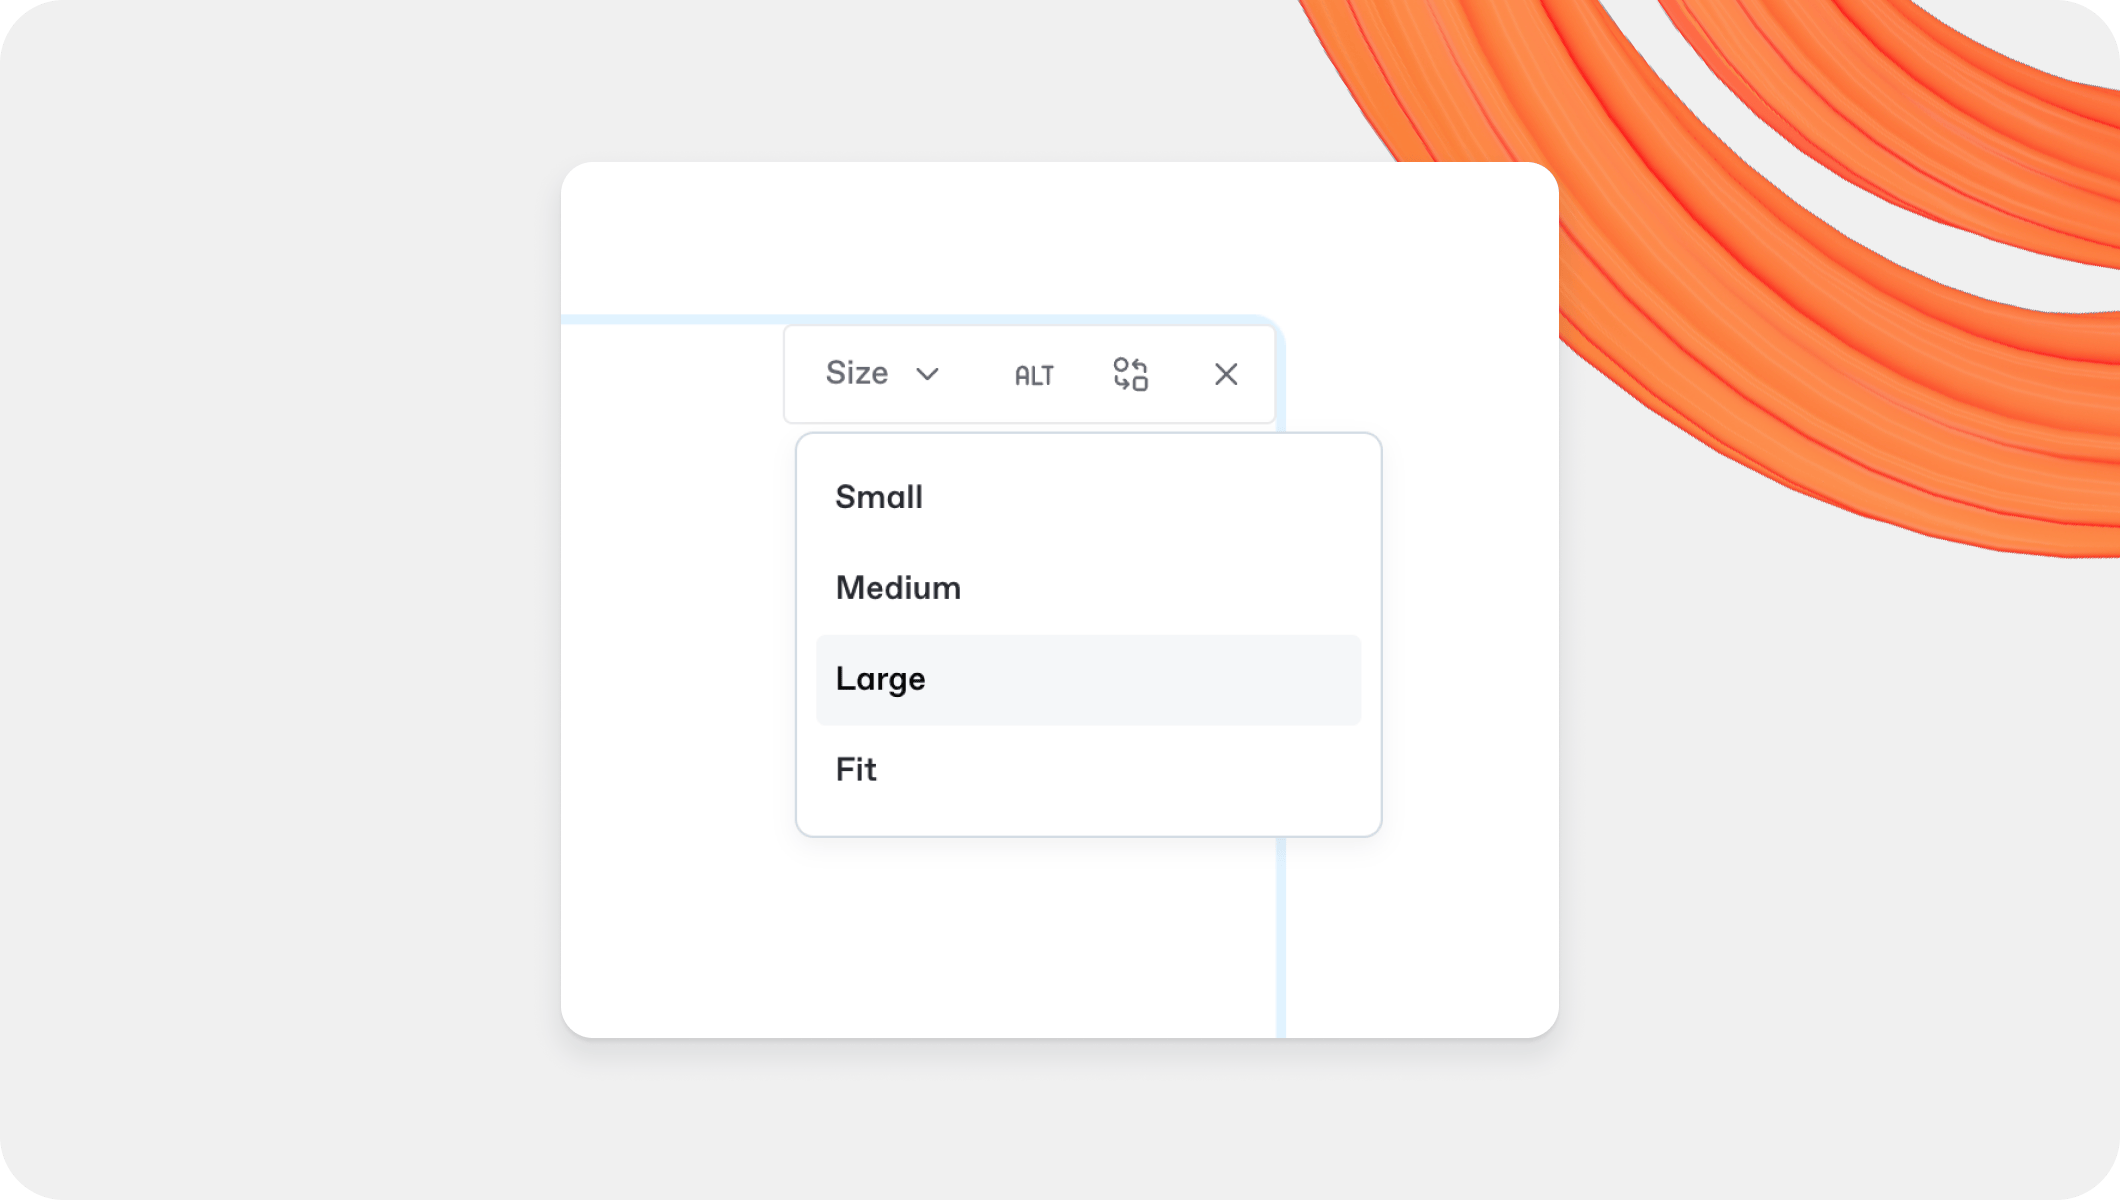
要调整图片大小，请将鼠标悬停其上并打开 **编辑菜单** <picture><source srcset="/files/kN09oTFtAuyaxNIwWuCt" media="(prefers-color-scheme: dark)"><img src="/files/ffffa8d3208c93af4ead7061897fa70e6d0d612f" alt=""></picture>。点击 **大小** 按钮，从可用选项中更改图片大小。

<figure><img src="/files/20a7c73e7b0247d943b643492a09b886b784f201" alt="A GitBook screenshot showing how to resize an image"><figcaption><p>调整图片大小</p></figcaption></figure>

* **小** – 图片大小的 25%
* **中等** – 图片大小的 50%
* **大** – 图片大小的 75%
* **适应** – 移除所有大小规格，并以原始大小显示，或者对于较大的图片将最大宽度限制为 **735** **像素** 。

如果您的图片比编辑器更宽，GitBook 会将图片宽度限制为编辑器宽度，并基于此限制进行调整大小。

{% hint style="info" %}
**注意：** 在图片画廊中调整图片大小时，结果可能与调整单张图片不同。
{% endhint %}

### 通过 Git Sync 调整图片大小

如果您想更精确地控制图片大小，可以在 GitHub 或 GitLab 中使用 Markdown 指定确切尺寸。

当我们导出图片时，会使用 HTML 标签 `<img/>`。根据规范，我们可以使用 `宽度` 并 `高度` 属性来指定图片尺寸，这些属性只接受像素值或数字与 `%` 符号的组合。\n\n用于指定图片尺寸的有效变体包括：\
\
`<img width="100" />` 将图片设置为宽 100 像素\
`<img width="100%" />` 将图片设置为原始大小（不过会受编辑器限制）

### 图片对齐

默认情况下，图片块会以原始大小居中显示图片。

要更改图片的对齐方式，请打开该块的 **选项菜单** <picture><source srcset="/files/QLUQj6waZRiK6FpSqrt6" media="(prefers-color-scheme: dark)"><img src="/files/e1df373962dc4830bcb786d7e5cb3cce603367d3" alt="The Options menu icon in GitBook"></picture> 并选择您想要的对齐方式。这只会影响比编辑器窄的图片，或者您已 [调整大小](#resizing).

### 为图片添加边框

您可以为图片块添加边框，让图片呈现一致的外观，并在视觉上与周围内容区分开来。

<div data-with-frame="true"><figure><img src="/files/1b8135295ba3b1268f33d26708a732532c342cc5" alt="A black and white photograph of a lone figure walking across a stark white landscape"><figcaption><p>带边框的图片可以带有说明文字，并会在说明文字后方显示一层淡淡的网格。</p></figcaption></figure></div>

要给图片添加边框，请将鼠标悬停其上，打开该块的 **选项菜单** <picture><source srcset="/files/QLUQj6waZRiK6FpSqrt6" media="(prefers-color-scheme: dark)"><img src="/files/e1df373962dc4830bcb786d7e5cb3cce603367d3" alt=""></picture> 并启用 **带边框** 切换开关。

{% hint style="info" %}
**提示：** 您只能为块中的单张图片添加边框。包含多张图片的图片块和行内图片不能添加边框。
{% endhint %}

### Markdown 中的表示

```markdown
//简单块
![](https://gitbook.com/images/gitbook.png)

//带说明文字的块
![GitBook 标志](https://gitbook.com/images/gitbook.png)

//带替代文本的块

<figure><img src="https://gitbook.com/images/gitbook.png" alt="GitBook 标志"></figure>

//带说明文字和替代文本的块

<figure><img src="https://gitbook.com/images/gitbook.png" alt="GitBook 标志"><figcaption><p>GitBook 标志</p></figcaption></figure>

// 带边框图片的块

<div data-with-frame="true"><img src="https://gitbook.com/images/gitbook.png" alt="GitBook 标志"></div>

//带有深色和浅色模式不同图片的块，带说明文字

<figure>
  <picture>
    <source srcset="https://user-images.githubusercontent.com/3369400/139447912-e0f43f33-6d9f-45f8-be46-2df5bbc91289.png" media="(prefers-color-scheme: dark)">
    <img src="https://user-images.githubusercontent.com/3369400/139448065-39a229ba-4b06-434b-bc67-616e2ed80c8f.png" alt="GitHub 标志">
  </picture>
  <figcaption>说明文字</figcaption>
</figure>
```

### 为什么我的图片没有加载？

“无法加载图片”错误表示图片在源头被更改或删除。如果您是通过 URL 嵌入图片而不是上传到 GitBook，GitBook 就依赖于该 URL——如果图片在源站移动或消失，它就会停止在您的页面上显示。

要解决此问题，请将图片直接上传到 GitBook，或者如果图片位置已更改，请更新 URL。此错误也可能在您将图片从一个章节复制到另一个章节时出现，因为每个章节都有自己的文件目录——请在新章节中重新上传图片。

您可以在 **资料库** 标签页中查看上传到某个章节的所有文件，旁边是 **页面** 位于目录顶部。


---

# Agent Instructions
This documentation is published with GitBook. GitBook is the documentation platform designed so that both humans and AI agents can read, navigate, and reason over technical content effectively. Learn more at gitbook.com.

## Querying This Documentation
If you need additional information that is not directly available in this page, you can query the documentation dynamically by asking a question.

Perform an HTTP GET request on the current page URL with the `ask` query parameter, and the optional `goal` query parameter:

```
GET https://gitbook.com/docs/documentation/zh/chuang-jian-nei-rong/blocks/insert-images.md?ask=<question>&goal=<endgoal>
```

`ask` is the immediate question: it should be specific, self-contained, and written in natural language.
`goal` is optional and describes the broader end goal you are ultimately trying to accomplish on behalf of the user. GitBook uses it to tailor the answer towards what is most useful for that goal.

The response will contain a direct answer to the question and relevant excerpts and sources from the documentation.

Use this mechanism when the answer is not explicitly present in the current page, you need clarification or additional context, or you want to retrieve related documentation sections.