> For the complete documentation index, see [llms.txt](https://gitbook.com/docs/llms.txt). Markdown versions of documentation pages are available by appending `.md` to page URLs; this page is available as [Markdown](https://gitbook.com/docs/documentation/zh/fa-bu/site-audience/authenticated-access/setting-up-azure-ad.md).

# 设置 Azure AD

为你的文档访客设置 Azure AD 登录界面

{% hint style="warning" %}
本指南将带你完成为文档设置受保护登录页面的过程。在阅读本指南之前，请确保你已经先完成了以下过程： [启用已认证访问](/docs/documentation/zh/fa-bu/site-audience/authenticated-access/enabling-authenticated-access.md).
{% endhint %}

{% hint style="info" %}
Azure 集成存在一个已知限制：身份验证后，标题 URL 片段会被移除。用户仍会进入正确的页面，但会被带到页面顶部，而不是 URL 中的标题位置。一旦用户通过身份验证，此行为在该会话期间将不再发生，用户将被定向到正确的标题位置。

这是由于 Microsoft 实施的一项安全措施。
{% endhint %}

### 概述

要使用 Azure AD 为您的 GitBook 站点设置经过身份验证的访问，流程如下：

{% stepper %}
{% step %}
[**在 Azure AD 中创建应用注册**](#id-1.-create-an-app-registration-in-azure-a-d)

在 Microsoft Entra ID 管理仪表板中创建一个 Azure AD 应用注册。
{% endstep %}

{% step %}
[**在您的站点上安装并配置 Azure AD 集成**](#id-2.-install-and-configure-the-azure-a-d-integration)

安装 Azure AD 集成，并将所需配置添加到您的 GitBook 站点。
{% endstep %}

{% step %}
[**为自适应内容配置 Azure AD（可选）**](#id-3.-configure-azure-a-d-for-adaptive-content-optional)

配置您的 Azure AD，使其与 GitBook 中的自适应内容配合使用。
{% endstep %}
{% endstepper %}

### 1. 在 Azure AD 中创建应用注册

首先在 Microsoft Entra ID 仪表板中创建应用注册。此应用注册将允许 GitBook Azure AD 集成请求令牌，以在授予用户访问您的站点之前验证其身份。

1. 登录到您的 Microsoft Entra ID 管理 [仪表板](https://entra.microsoft.com/).
2. 前往 **标识** > **应用程序** > **应用注册** ，位于左侧边栏。
3. 点击 **+ 新注册，** 并为您的注册命名。
4. 在 **支持的帐户类型，** 选择“**仅此组织目录中的帐户（仅默认目录 - 单租户）”**.
5. 暂时将重定向 URI 字段留空——稍后需要填写。
6. 点击 **注册** 以完成应用注册。<br>

   <figure><img src="https://2111890564-files.gitbook.io/~/files/v0/b/gitbook-x-prod.appspot.com/o/spaces%2FNkEGS7hzeqa35sMXQZ4X%2Fuploads%2FuB6p6HxRmveHp1cfsiKa%2Fazure_ad_integration_register_app.png?alt=media&amp;token=cbc82bc5-189e-433a-b990-042066768307" alt="An Azure screenshot showing how to register an Azure AD app"><figcaption><p>为 GitBook VA 集成注册一个应用。</p></figcaption></figure>
7. 然后您应该会看到新的应用注册 **概述** 页面。复制并记下 **应用程序（客户端）ID** 以及 **目录（租户）ID**.<br>

   <figure><img src="https://2111890564-files.gitbook.io/~/files/v0/b/gitbook-x-prod.appspot.com/o/spaces%2FNkEGS7hzeqa35sMXQZ4X%2Fuploads%2FETQziXVuqGnho8GGOVBZ%2Fazure_ad_integration_app_reg_overview.png?alt=media&amp;token=266a55e3-db75-4a4a-923c-8302f69653d5" alt="An Azure screenshot showing the app registration overview"><figcaption><p>新创建的应用注册概览。</p></figcaption></figure>
8. 点击 **添加证书或机密**。您应该会看到以下 **证书和机密** 页面：<br>

   <figure><img src="https://2111890564-files.gitbook.io/~/files/v0/b/gitbook-x-prod.appspot.com/o/spaces%2FNkEGS7hzeqa35sMXQZ4X%2Fuploads%2FnXJbnpnGhOI6Udjrx8bS%2Fazure_ad_integration_client_secrets.png?alt=media&amp;token=9202689b-4657-4bea-bf74-42b51e1051e5" alt="An Azure screenshot showing where to add a certificate or secret"><figcaption><p>添加证书或机密。</p></figcaption></figure>
9. 点击 **+ 新建客户端机密**.
10. 为机密输入合适的说明，然后点击 **添加**.
11. 复制并记下 **值** 字段（***不** 即机密 ID*）对应的机密。

### 2. 安装并配置 Azure AD 集成

创建 Azure AD 应用注册后，下一步是在 GitBook 中安装 Azure AD 集成，并使用您之前生成的凭据将其与 Azure 应用关联：

1. 导航到您已 [启用经过身份验证的访问](/docs/documentation/zh/fa-bu/site-audience/authenticated-access/enabling-authenticated-access.md#enable-authenticated-access) 并希望将 Azure AD 作为身份提供方的网站。
2. 点击 **集成** 按钮，位于站点设置右上角。<br>

   <figure><img src="https://2111890564-files.gitbook.io/~/files/v0/b/gitbook-x-prod.appspot.com/o/spaces%2FNkEGS7hzeqa35sMXQZ4X%2Fuploads%2FgBMsbydNsuqx7eqcz0JN%2Fva_site_integration_overview_screen.png?alt=media&amp;token=ead70cf3-93cf-4aef-b77a-321afad38900" alt="A GitBook screenshot showing the site settings overview"><figcaption></figcaption></figure>
3. 点击 **已认证访问** ，从侧边栏的类别中。
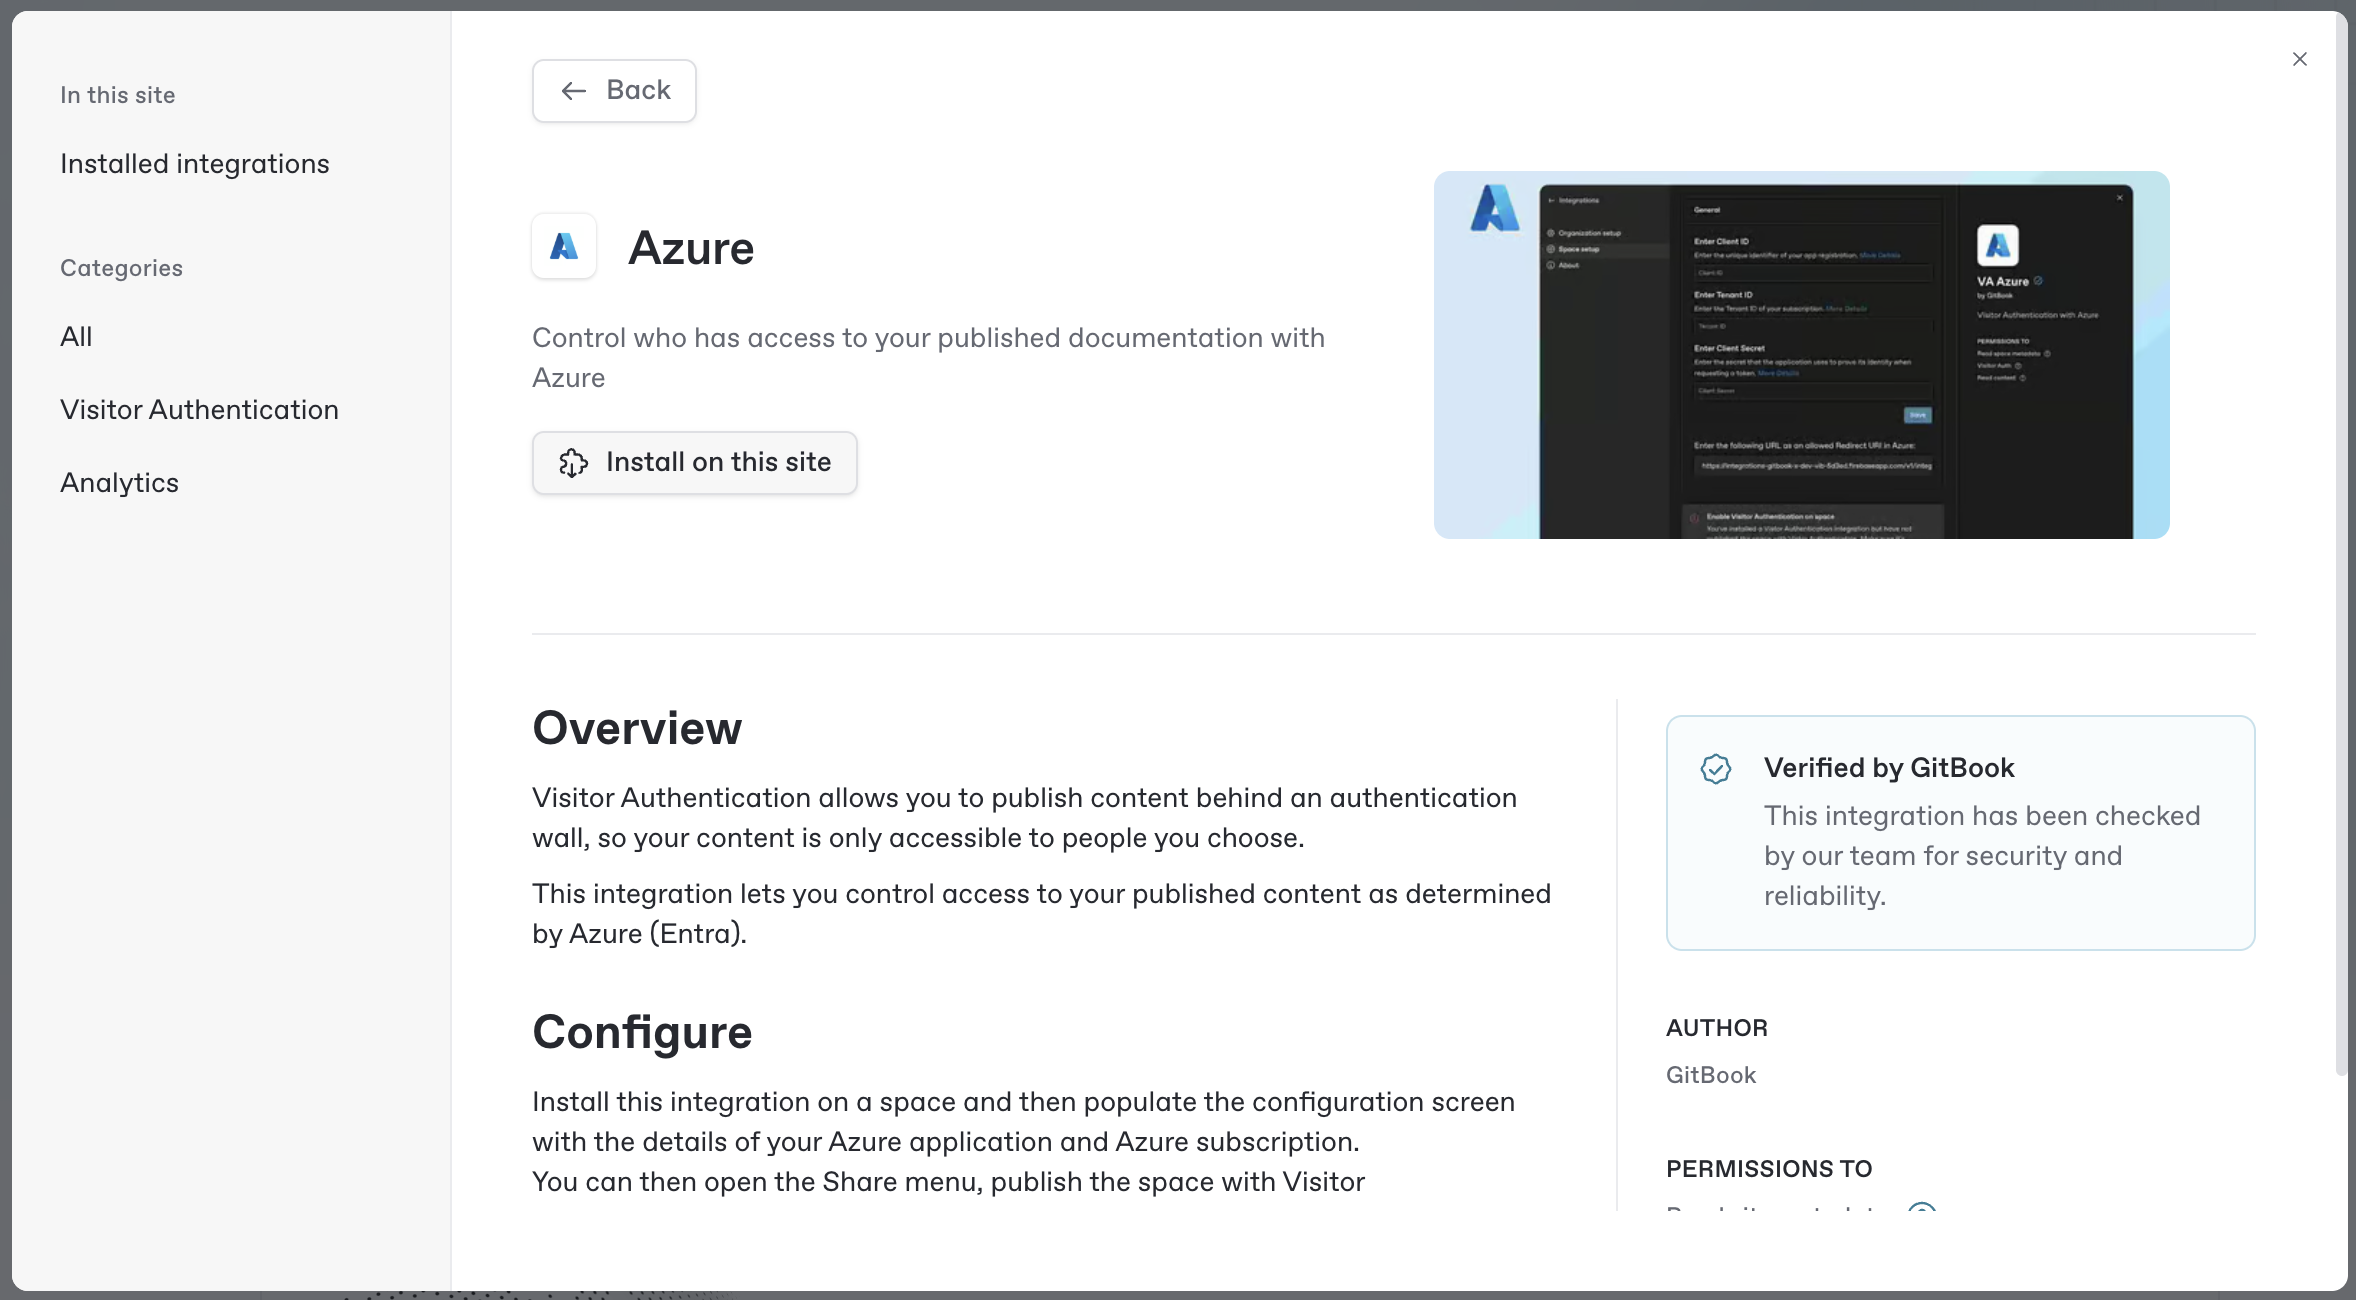
4. 选择 **Azure** 集成。
5. 点击 **安装到此站点**.<br>

   <figure><img src="https://2111890564-files.gitbook.io/~/files/v0/b/gitbook-x-prod.appspot.com/o/spaces%2FNkEGS7hzeqa35sMXQZ4X%2Fuploads%2FCiveWUn0FWMEdS3YRU62%2FScreenshot%202025-03-24%20at%2018.10.09.png?alt=media&amp;token=fcaedce7-40f5-40e5-acd1-040e90822be4" alt="A GitBook screenshot showing installation of the Azure AD integration"><figcaption></figcaption></figure>
6. 在您的站点上安装集成后，您应该会看到该集成的配置界面：<br>

   <figure><img src="https://2111890564-files.gitbook.io/~/files/v0/b/gitbook-x-prod.appspot.com/o/spaces%2FNkEGS7hzeqa35sMXQZ4X%2Fuploads%2FvO9pXBCZkcprDDIVFkcf%2FScreenshot%202025-03-24%20at%2018.17.02.png?alt=media&amp;token=e082d3dd-1e6b-44b4-beaf-a5d67812e055" alt="A GitBook screenshot showing the Azure AD configuration dialog"><figcaption></figcaption></figure>
7. 输入 **客户端 ID**, **租户 ID**，以及 **客户端机密** 值，这些值是您在 [之前创建 Azure AD 应用注册后](#id-1.-create-an-app-registration-in-azure-a-d) 复制的，然后点击“保存”。
8. 复制 **URL** ，它显示在 **对话框底部**.
9. 返回到您之前在 Microsoft Entra ID 仪表板中创建的 Azure AD 应用注册。
10. 浏览到 **管理** > **身份验证** ，位于侧边栏中。
11. 点击 **+ 添加平台** 并选择 **Web** 卡片，在打开的面板中。<br>

    <figure><img src="https://2111890564-files.gitbook.io/~/files/v0/b/gitbook-x-prod.appspot.com/o/spaces%2FNkEGS7hzeqa35sMXQZ4X%2Fuploads%2FUssw9BNY66urLYH376sE%2FScreenshot%202025-03-24%20at%2018.28.58.png?alt=media&amp;token=2c2b2b84-b7e9-4fc3-a7bd-2751dacfd579" alt="An Azure screenshot showing authentication platform settings"><figcaption></figcaption></figure>
12. 粘贴您之前复制的 GitBook 集成 **URL** 到 **重定向 URI** 字段中，然后点击“配置”<br>

    <figure><img src="https://2111890564-files.gitbook.io/~/files/v0/b/gitbook-x-prod.appspot.com/o/spaces%2FNkEGS7hzeqa35sMXQZ4X%2Fuploads%2Fi9fVjsa351I6kVzJw64X%2Fimage.png?alt=media&amp;token=85d1d25a-bdb8-4453-b30e-54a21304f870" alt="An Azure screenshot showing where to enter the redirect URI"><figcaption></figcaption></figure>
13. 返回到 **Azure 集成** 安装页面 **在 GitBook 中**.
14. 关闭集成对话框，然后点击站点页面中的 **设置** 选项卡。
15. 浏览到 **受众** 并选择 **经过身份验证的访问** （如果尚未选择）。
16. 选择 **Azure** 从下拉菜单中 **身份验证后端** 部分。
17. 点击 **更新受众**.<br>

    <figure><img src="https://2111890564-files.gitbook.io/~/files/v0/b/gitbook-x-prod.appspot.com/o/spaces%2FNkEGS7hzeqa35sMXQZ4X%2Fuploads%2Finc5DrItbyXUIXP4K4ic%2FScreenshot%202025-03-24%20at%2018.41.45.png?alt=media&amp;token=e06283f6-f7d6-4556-9ef7-747b47493064" alt="A GitBook screenshot showing authenticated access settings"><figcaption></figcaption></figure>
18. 前往站点概览页面，然后点击 **发布** 如果站点尚未发布。

现在，您的站点已在 Azure AD 作为身份提供方的经过身份验证的访问后方发布。

要进行测试，请点击“访问”。系统会要求您使用 Azure 登录，这确认了您的站点已通过 Azure 的经过身份验证的访问方式发布。

{% hint style="info" %}
在访问已发布内容 URL 并使用 Azure 凭据登录后，您可能会看到一个提示，告诉您需要向管理员“请求批准”。您的管理员可以通过访问已发布内容 URL、登录，并代表组织授予批准来完成此请求。
{% endhint %}

### 3. 为自适应内容配置 Azure AD（可选）

要在您的经过身份验证访问的站点中利用自适应内容功能，请配置 Azure AD 应用注册，以便将更多用户信息作为声明包含在身份验证令牌中。

这些声明以键值对的形式传递给 GitBook，可用于 [自适应内容](/docs/documentation/zh/fa-bu/adaptive-content/adapting-your-content.md) 为你的站点访客动态调整。

Azure AD 支持不同类型和级别的声明，每种都有各自的设置方法：

* **标准声明**：可能包含在令牌中的常见声明，但默认并不总是存在。

{% hint style="info" %}
Azure AD 会保持令牌大小以优化性能。因此，许多声明 **不** 默认包含在令牌中，必须由应用显式请求。为确保诸如 `电子邮件` , `组` 或 `角色` 之类的声明被包含，它们必须被显式请求为 **可选声明**.
{% endhint %}

* **可选声明**：可为应用启用的额外预定义声明。
* **自定义声明**：来自 Azure AD 中自定义用户属性或通过自定义声明提供程序从外部系统获取的声明。

有关如何在您的 Azure AD 应用生成的令牌中包含这些不同类型声明的更多详情，请参阅以下 Microsoft Entra 文档指南：

* [用户属性](https://learn.microsoft.com/en-us/entra/external-id/customers/how-to-add-attributes-to-token)
* [可选声明](https://learn.microsoft.com/en-us/entra/identity-platform/optional-claims?toc=%2Fentra%2Fexternal-id%2Ftoc.json\&bc=%2Fentra%2Fexternal-id%2Fbreadcrumb%2Ftoc.json\&tabs=appui)
* [自定义声明](https://learn.microsoft.com/en-us/entra/identity-platform/custom-claims-provider-overview)

在完成设置并配置要发送给 GitBook 的正确声明后，前往“[自适应你的内容](/docs/documentation/zh/fa-bu/adaptive-content/adapting-your-content.md)”继续配置你的站点。


---

# Agent Instructions
This documentation is published with GitBook. GitBook is the documentation platform designed so that both humans and AI agents can read, navigate, and reason over technical content effectively. Learn more at gitbook.com.

## Querying This Documentation
If you need additional information that is not directly available in this page, you can query the documentation dynamically by asking a question.

Perform an HTTP GET request on the current page URL with the `ask` query parameter, and the optional `goal` query parameter:

```
GET https://gitbook.com/docs/documentation/zh/fa-bu/site-audience/authenticated-access/setting-up-azure-ad.md?ask=<question>&goal=<endgoal>
```

`ask` is the immediate question: it should be specific, self-contained, and written in natural language.
`goal` is optional and describes the broader end goal you are ultimately trying to accomplish on behalf of the user. GitBook uses it to tailor the answer towards what is most useful for that goal.

The response will contain a direct answer to the question and relevant excerpts and sources from the documentation.

Use this mechanism when the answer is not explicitly present in the current page, you need clarification or additional context, or you want to retrieve related documentation sections.