> For the complete documentation index, see [llms.txt](https://gitbook.com/docs/llms.txt). Markdown versions of documentation pages are available by appending `.md` to page URLs; this page is available as [Markdown](https://gitbook.com/docs/documentation/ja-gitbook-documentation/rifarensu/gitbook-ui.md).

# GitBook UI

GitBook はドキュメントサイトを中心に整理されています。まずは組織から始まります **ホーム**、サイトを開いてその内容を編集し、セクション内のページを編集します。このページでは、インターフェースの各部分を順に説明します。

### ホーム

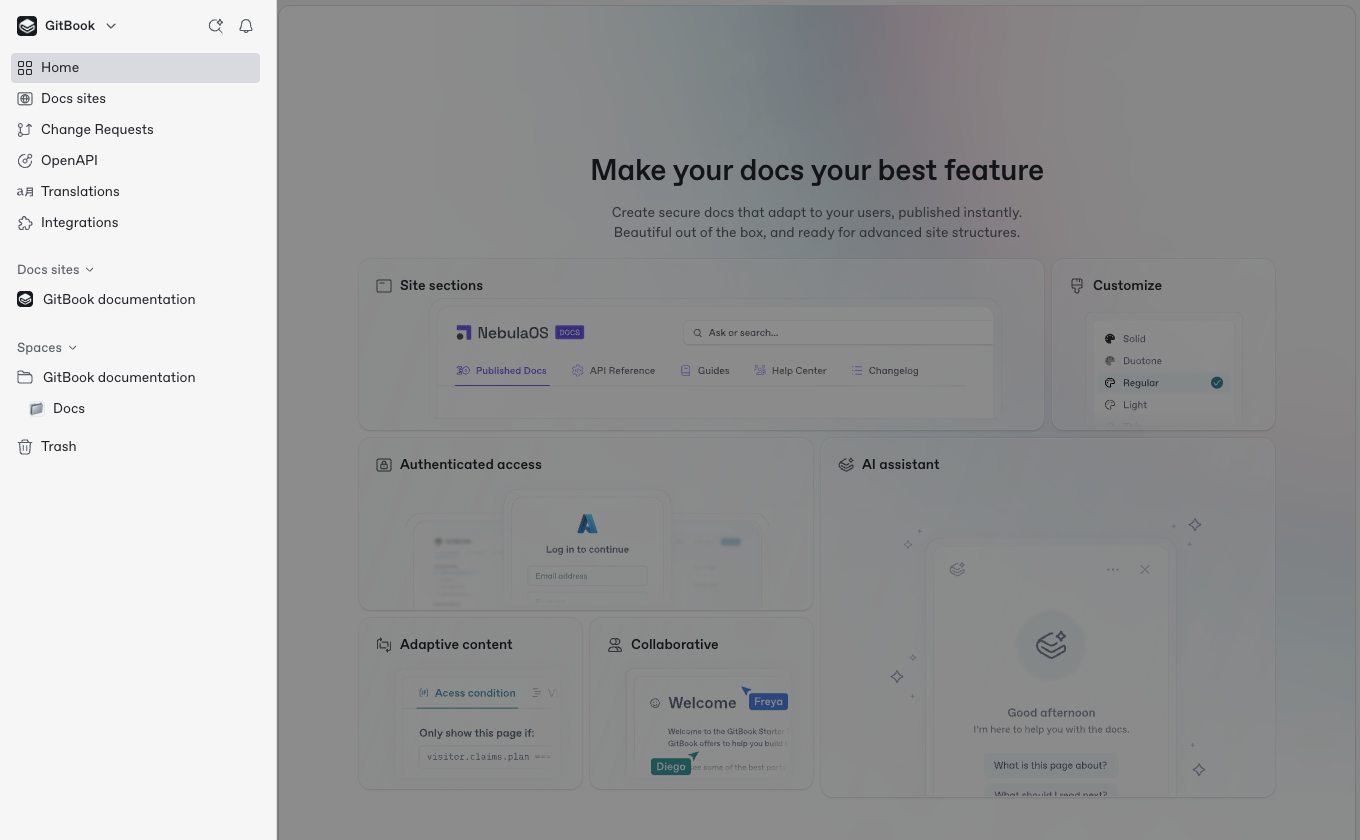
<div data-with-frame="true"><figure><img src="/files/b2e6c44bca9924f530439ec07c574751b9aa7f0b" alt=""><figcaption><p>組織のホームでは、サイト、コンテンツ、組織の管理機能にアクセスできます。</p></figcaption></figure></div>

GitBook を開くと、組織の **ホーム**：組織内のすべてのドキュメントサイトを一か所で確認できます。ここからサイトを開いたり、新しいサイトを作成したり、組織全体の設定を調整したりできます。ホームには以下が含まれます：

* **切り替え**\
  に戻る **ホーム** サイドバー上部の切り替えを使って、どこからでもアクセスできます。複数の組織に所属している場合は、ここでそれらを表示して切り替えたり、新しい組織を作成したりできます。
* **通知**\
  コメントや会話でメンションされたとき、または作業中のセクションで重要なアクティビティがあると、 [通知](/docs/documentation/ja-gitbook-documentation/koraborshon/notifications.md) 新着情報を
* **質問するか検索**\
  提供： [GitBook Agent](/docs/documentation/ja-gitbook-documentation/kontentsuwo/searching-your-content/gitbook-ai.md)、自然言語で質問したり、組織内のサイトやコンテンツを検索したりできます。
* **サイト一覧**\
  組織内のすべてのドキュメントサイトを表示します。サイトをクリックして開きます。
* **すべてのコンテンツ**\
  組織にどのサイトにも属していないコンテンツがある場合、それは **すべてのコンテンツ** サイトと並んでツリー表示のセクションに表示されます。すべてのコンテンツがいずれかのサイトに属している場合、このセクションは表示されません。
* **設定**\
  [組織設定](/docs/documentation/ja-gitbook-documentation/akauntoto/organization-settings.md) 、 [アカウント設定](/docs/documentation/ja-gitbook-documentation/akauntoto/account-settings.md) 専用の画面を 1 つ共有します。設定は次のようにグループ化されています： **アカウント** 、 **組織**.

  **アカウント** には次が含まれます **一般**, **通知**, **組織**、および **開発者ツール**. **組織** には次が含まれます **一般**, **メンバー**, **マージルール**, **GitBook Agent**, **統合**, **OpenAPI**, **翻訳**, **招待リンク**, **チーム**, **SSO**、および **請求**。クリック **アプリに戻る** で作業に戻ります。
* **スタイルガイド**\
  すべてを表示 [スタイルガイド](/docs/documentation/ja-gitbook-documentation/saitowo/site-structure.md) 組織内のすべてのスタイルガイドと、それを使用しているサイトを表示します。
* **ゴミ箱**\
  削除されたセクションは **ゴミ箱**に表示されます。最大 7 日間は復元できます。それ以降は完全に削除されます。

### サイトのサイドバー

サイトを開くと、サイドバーはそのサイトのコンテンツとツールに置き換わります。これは公開サイトで訪問者が見るのと同じ構造です。サイトのサイドバーには以下が含まれます：

* **サイトヘッダー**\
  サイト名と公開状態に加えて、 **プレビュー** 、 **公開** ボタン。
* **一般**\
  **概要**, **変更リクエスト**, **サイト構造**、および **設定**.
* **ツール**\
  **スタイルガイド**, **カスタマイズ**, **分析**、および **拡張**。それぞれメインビューで開きます。
* **コンテンツ**\
  サイトの [セクション](/docs/documentation/ja-gitbook-documentation/saitowo/site-structure/site-sections.md) とグループが、公開順で表示されます。セクションをクリックして編集します。

  ツリーは読み取り専用です。再構成は [構造エディター](/docs/documentation/ja-gitbook-documentation/saitowo/site-structure.md)で行います。検索、編集、 **+** のアイコンを使って **コンテンツ** ヘッダーからセクションの検索、名前変更、追加を行います。

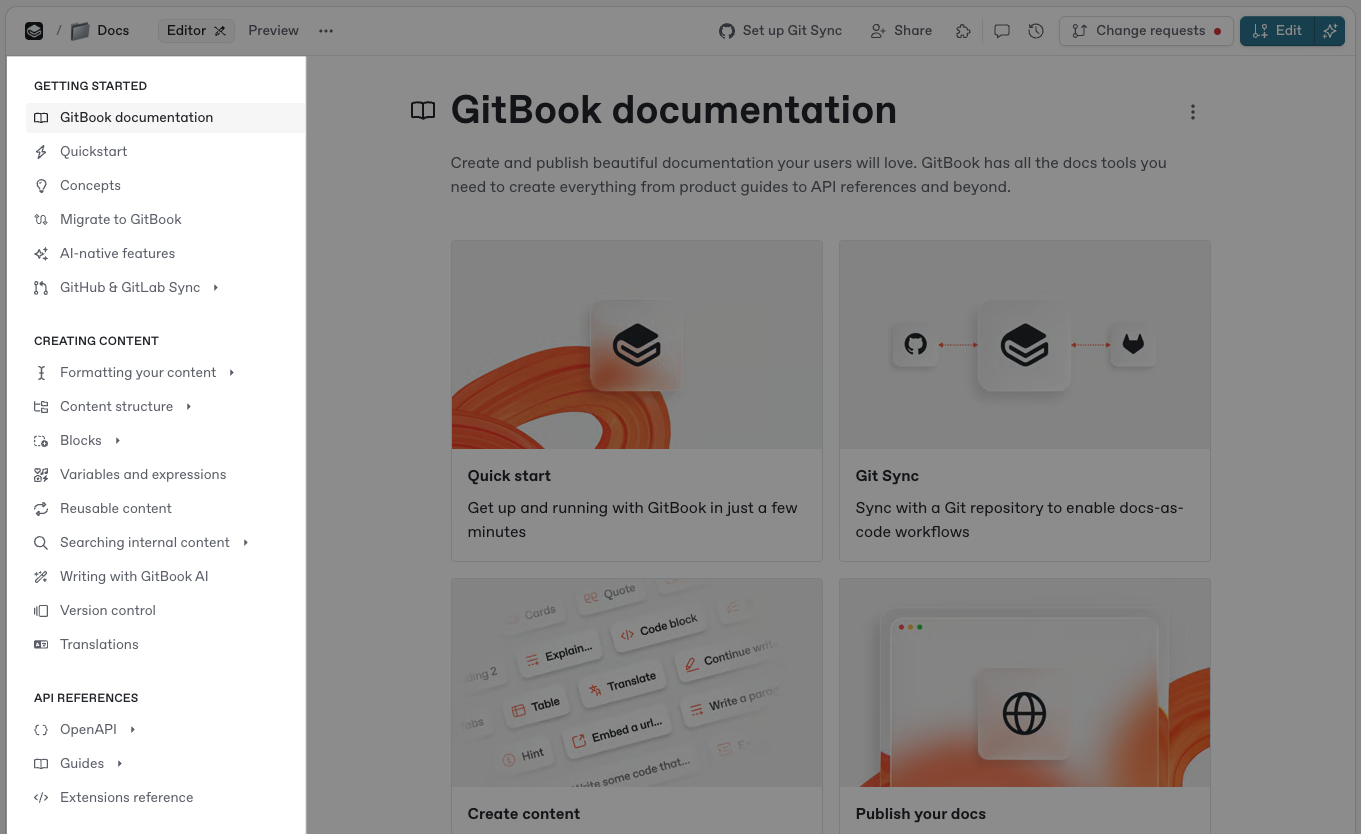
### 目次 <a href="#the-table-of-contents" id="the-table-of-contents"></a>

<div data-with-frame="true"><figure><img src="/files/84aa06dc19e115997d7acaa05733c5434775a372" alt=""><figcaption><p>目次には、選択したセクション内のすべてのページとリンクが一覧表示されます。</p></figcaption></figure></div>

デフォルトでは、目次には [ページ、リンク、ページグループが](/docs/documentation/ja-gitbook-documentation/kontentsuwo/content-structure/page.md#organizing-your-content) 選択したセクション内で一覧表示されます。サイドバーの右側に表示されます。

また、 [再利用可能なコンテンツ](/docs/documentation/ja-gitbook-documentation/kontentsuwo/reusable-content.md) 、 [ファイル](/docs/documentation/ja-gitbook-documentation/kontentsuwo/blocks/insert-files.md) をセクションごとに管理できます。

目次の **ページ** タブから、次のことができます：

* 新規作成 [ページ](#pages) とサブページを作成する。
* 作成 [ページグループ](#groups).
* 追加 [外部リンク](#external-links).
* アクセス [アクションメニュー](#the-actions-menu) <picture><source srcset="/files/YjlF3Z9KMYv9aQiFzZKD" media="(prefers-color-scheme: dark)"><img src="/files/3489a3405c2f5c8e7f31c02ff44e42d2e3e8dbf6" alt=""></picture> 個々のページに対して。

で、 **ライブラリ** タブから、次のことができます：

* セクション内の再利用可能なコンテンツ、変数、画像、ファイルを表示・検索できます。
* 他のセクションから再利用可能なコンテンツを表示して挿入できます。
* 新しいライブラリアイテムを作成またはインポートできます。
* ライブラリアイテムをページにドラッグ＆ドロップできます。
* ライブラリアイテムをダブルクリックして名前を変更します。
* 画像をプレビューできます。
* 画像とファイルを管理・ダウンロードできます。

目次、特にライブラリタブでできることを示す短い動画です：

{% embed url="<https://youtu.be/gg-VZP2wl-I>" %}

ページ内容に集中するには、目次の横にカーソルを合わせてクリックし、 **非表示** <picture><source srcset="/files/t7RZoZXBNdmA75mANdIQ" media="(prefers-color-scheme: dark)"><img src="/files/51335e46ab7a99acbe020260fdfaf9ac8e31ce84" alt="The Hide button icon in GitBook"></picture>。再び表示するには、ページ端の近くにカーソルを合わせてクリックし、 **表示** <picture><source srcset="/files/Vxv06rO6ZJQJWLfW9YHZ" media="(prefers-color-scheme: dark)"><img src="/files/bb7024eaedd2f98c153f2e03da65719f96faf501" alt="The Show button icon in GitBook"></picture>.

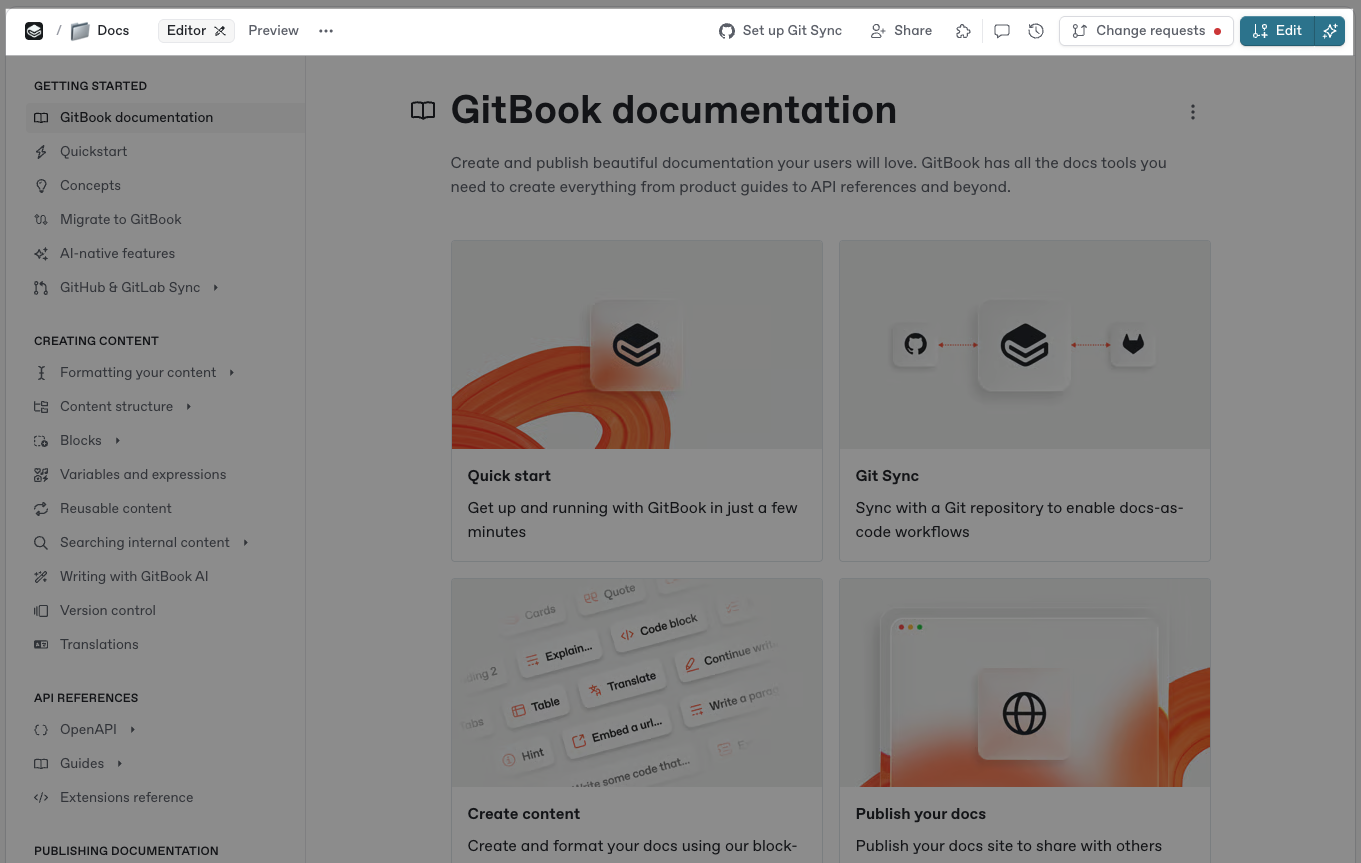
### セクションヘッダー <a href="#space-header" id="space-header"></a>

<div data-with-frame="true"><figure><img src="/files/f4dba1422343eabed6c7b41e3f70940680575969" alt=""><figcaption><p>セクションヘッダーはエディタ上部にあり、セクション全体に適用されるオプションを提供します。</p></figcaption></figure></div>

セクションヘッダーには、現在表示しているセクションに関する情報が含まれています。コメントや履歴を表示したり、次を設定したりできます： [GitHub または GitLab Sync](/docs/documentation/ja-gitbook-documentation/docs-as-code/git-sync.md)などを使って、デフォルトの設定をカスタマイズし、上書きできます。

{% hint style="info" %}
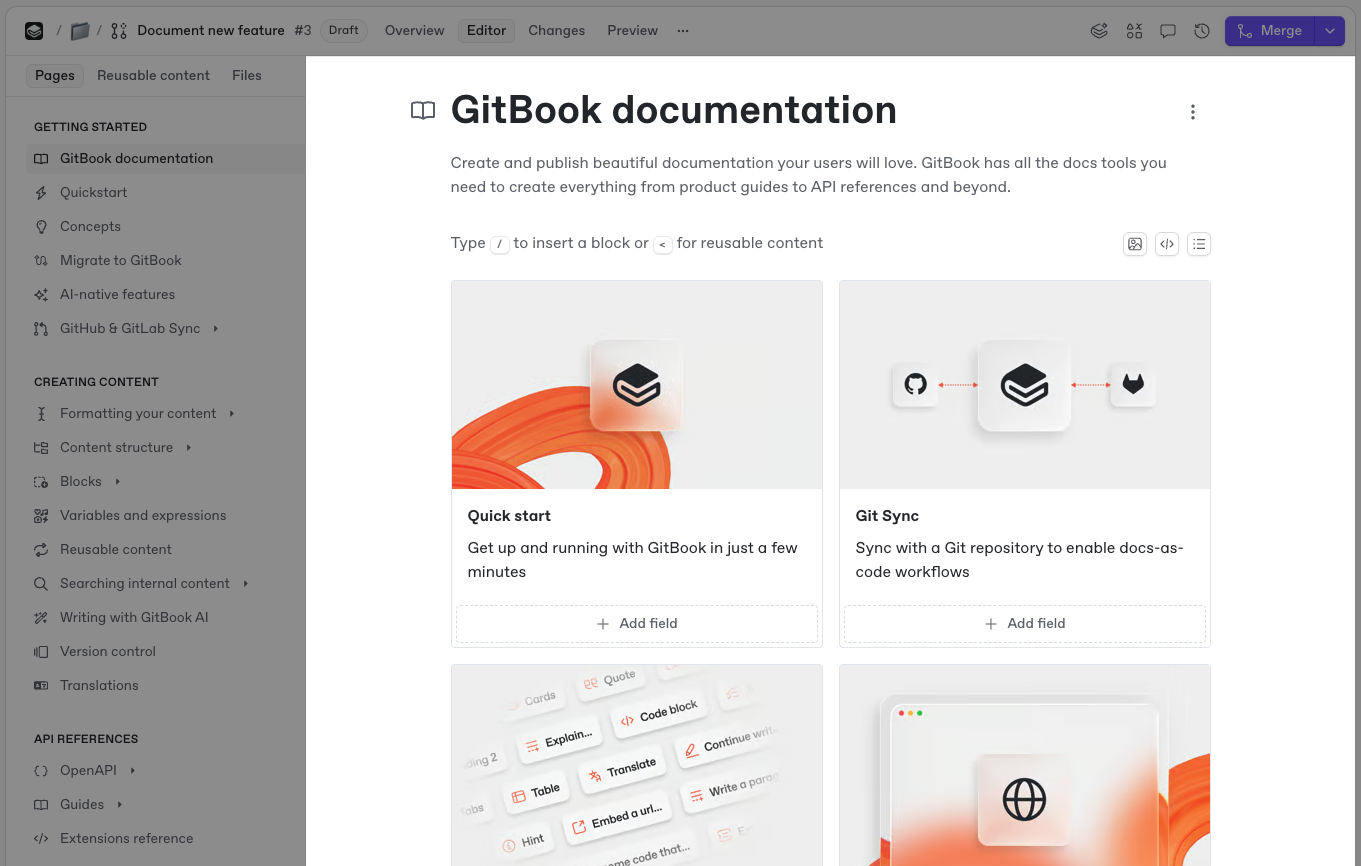
**セクションヘッダーは柔軟に変化し**、現在のセクションやモードに応じて表示が変わります。

たとえば、次を編集している場合、 [変更リクエスト](/docs/documentation/ja-gitbook-documentation/koraborshon/change-requests.md)、変更リクエストの概要が表示され、エディタを開く、変更内容を表示する、変更リクエストをマージするためのオプションが並びます。

読み取り専用のセクションを表示している場合、ライブ編集がロックされているため、ページを編集するには新しい変更リクエストを開く必要があります。
{% endhint %}

<div data-with-frame="true"><figure><img src="/files/f09175ce5da86be09c360276084b6746505581ca" alt=""><figcaption><p>変更リクエスト内のセクションヘッダー。</p></figcaption></figure></div>

セクションヘッダーには次が含まれます：

* **セクションの絵文字またはアイコン**\
  セクションをサイドバーで識別しやすくするために、絵文字またはアイコンを選択します。
* **セクション名**\
  この名前はサイドバーと公開サイトに表示されます。
* **セクションのパンくずリスト**\
  セクションが属するサイト、および必要に応じてグループ。
* **アクションメニュー**\
  セクション用の操作を提供します。次と同様に： [ページ操作](#the-actions-menu)、利用できる操作は編集モードによって異なります。
* **概要**\
  変更リクエストでは、そのタイトル、説明、参加者、レビュー担当者、変更内容、コメントを表示できます。
* **エディタ表示**\
  GitBook のブロックベースのエディタでコンテンツを編集します。
* **変更表示**\
  この表示では [変更点をハイライト表示し](/docs/documentation/ja-gitbook-documentation/koraborshon/change-requests.md#diff-mode) 、差分表示で変更リクエスト内の内容を確認できます。マージする前に変更をレビューしてください。
* **プレビュー**\
  変更リクエストをマージする前に、コンテンツをプレビューします。
* **コラボレーター**\
  セクション内のページを読んでいる人のアバターを表示します。アバターをクリックすると、その人が見ているページを開けます。
* **Git Sync の設定**\
  GitHub と GitLab を設定 [同期](/docs/documentation/ja-gitbook-documentation/docs-as-code/git-sync.md) をセクションごとに管理できます。
* **共有メニュー**\
  セクションを公開して共有するか、他の人を招待して共同作業できます。
* **変数**\
  再利用可能な [変数](/docs/documentation/ja-gitbook-documentation/kontentsuwo/variables-and-expressions.md) をセクションごとに管理できます。
* **GitBook Agent**\
  セクションの変更について [GitBook Agent](broken://pages/0c03628b701ac10b3d6b9608662ac6e31dd661fe).
* **コメント**\
  表示 [コメントと議論を](/docs/documentation/ja-gitbook-documentation/koraborshon/comments.md) セクションのコンテンツについて閲覧します。
* **変更リクエスト**\
  作成、更新、削除 [変更リクエスト](/docs/documentation/ja-gitbook-documentation/koraborshon/change-requests.md).
* **セクション履歴**\
  表示 [バージョン履歴](/docs/documentation/ja-gitbook-documentation/kontentsuwo/version-control.md) セクションまたは変更リクエストの。
* **編集ボタン**\
  セクションが公開されている場合、または [ライブ編集](/docs/documentation/ja-gitbook-documentation/koraborshon/live-edits.md) がロックされている場合、 **編集** を作成します [変更リクエスト](/docs/documentation/ja-gitbook-documentation/koraborshon/change-requests.md).

### サイトツール <a href="#site-headers" id="site-headers"></a>

サイトツールはメインビューのサイトサイドバーから開けます。サイトヘッダーには **プレビュー** 、 **公開**.

の下で **一般**:

* **概要**\
  URL、公開状態、対象読者、コンテンツ、最上位のインサイトなど、サイトの基本情報が表示されます。サイトが公開されると、 **概要** へのリンクが表示されます。
* **変更リクエスト**\
  サイト内の各セクションにわたる変更リクエスト。
* **サイト構造**\
  次を使用してください: [構造エディター](/docs/documentation/ja-gitbook-documentation/saitowo/site-structure.md) セクションとグループの追加、並べ替え、公開、削除を行います。
* **設定**\
  [サイト設定](/docs/documentation/ja-gitbook-documentation/saitowo/site-settings.md) 含まれます **一般**, **メンバー**, **エージェント**, **対象**, **ドメインとURL**, **リダイレクト**、および **プラン**.

の下で **ツール**:

* **スタイルガイド**\
  サイトの [スタイルガイド](/docs/documentation/ja-gitbook-documentation/saitowo/site-structure.md) は、執筆ルールと規則を定義します。GitBook Agent は、コンテンツの作成、編集、レビュー時にこれに従います。
* **カスタマイズ**\
  [サイトをカスタマイズ](/docs/documentation/ja-gitbook-documentation/saitowo/customization.md) を **テーマ**, **レイアウト**, **AI アシスタント**、および **設定** のオプション。
* **分析**\
  **AI インサイト** 、 **分析** 提供します [詳細な分析](/docs/documentation/ja-gitbook-documentation/anaritikusu/insights.md) サイトとそのパフォーマンスに関する。
* **拡張**\
  **接続**, **チャネル**, **Docs Embed**, **MCP アクセス**、および [**統合**](/docs/documentation/ja-gitbook-documentation/saitowo/install-an-integration.md).

### コンテンツエディタ

<div data-with-frame="true"><figure><img src="/files/6bb4d3324f741f52b228014e9e56d3d85e123885" alt=""><figcaption><p>GitBook エディタでコンテンツを書き、ブロックを追加します。</p></figcaption></figure></div>

エディタはセクションの中心です。コンテンツを書いて挿入し、その後チームとリアルタイムで共同作業できます。

挿入 [コンテンツブロック](/docs/documentation/ja-gitbook-documentation/kontentsuwo/blocks.md)、記述し [Markdown](/docs/documentation/ja-gitbook-documentation/kontentsuwo/formatting/markdown.md), [埋め込みコンテンツ](/docs/documentation/ja-gitbook-documentation/kontentsuwo/blocks/embed-a-url.md)、共同作業します [GitBook Agent](broken://pages/0c03628b701ac10b3d6b9608662ac6e31dd661fe).

ブロックにコメントしたり、チームメイトをタグ付けしたりすることもできます。

### ページのタイトルと説明 <a href="#page-title" id="page-title"></a>

各ページの上部で、タイトルを設定し、任意で絵文字を追加し、説明を記入します。タイトルは目次に表示され、公開 URL のスラッグになります。

ページ説明は最大 200 文字まで入力できます。検索エンジンではプレビュー文として表示されます。

{% hint style="info" %}
ページの URL スラッグを変更するには、ページの [アクションメニュー](#the-actions-menu) に戻って **タイトルとスラッグを編集**.
{% endhint %}

### ページ操作メニュー <a href="#the-actions-menu" id="the-actions-menu"></a>

ページの **アクションメニュー** <picture><source srcset="/files/YjlF3Z9KMYv9aQiFzZKD" media="(prefers-color-scheme: dark)"><img src="/files/3489a3405c2f5c8e7f31c02ff44e42d2e3e8dbf6" alt="The Actions menu icon in GitBook"></picture> を使うと、ページの複製、名前変更、削除ができます。

目次でページにカーソルを合わせ、次のアイコンをクリックします。 <picture><source srcset="/files/YjlF3Z9KMYv9aQiFzZKD" media="(prefers-color-scheme: dark)"><img src="/files/3489a3405c2f5c8e7f31c02ff44e42d2e3e8dbf6" alt="The Actions menu icon in GitBook"></picture> アイコン。ページタイトルの横にあるアイコンをクリックすることもできます。

{% hint style="info" %}
利用可能な操作は、 [ライブ編集](/docs/documentation/ja-gitbook-documentation/koraborshon/live-edits.md) か [変更リクエスト](/docs/documentation/ja-gitbook-documentation/koraborshon/change-requests.md).
{% endhint %}

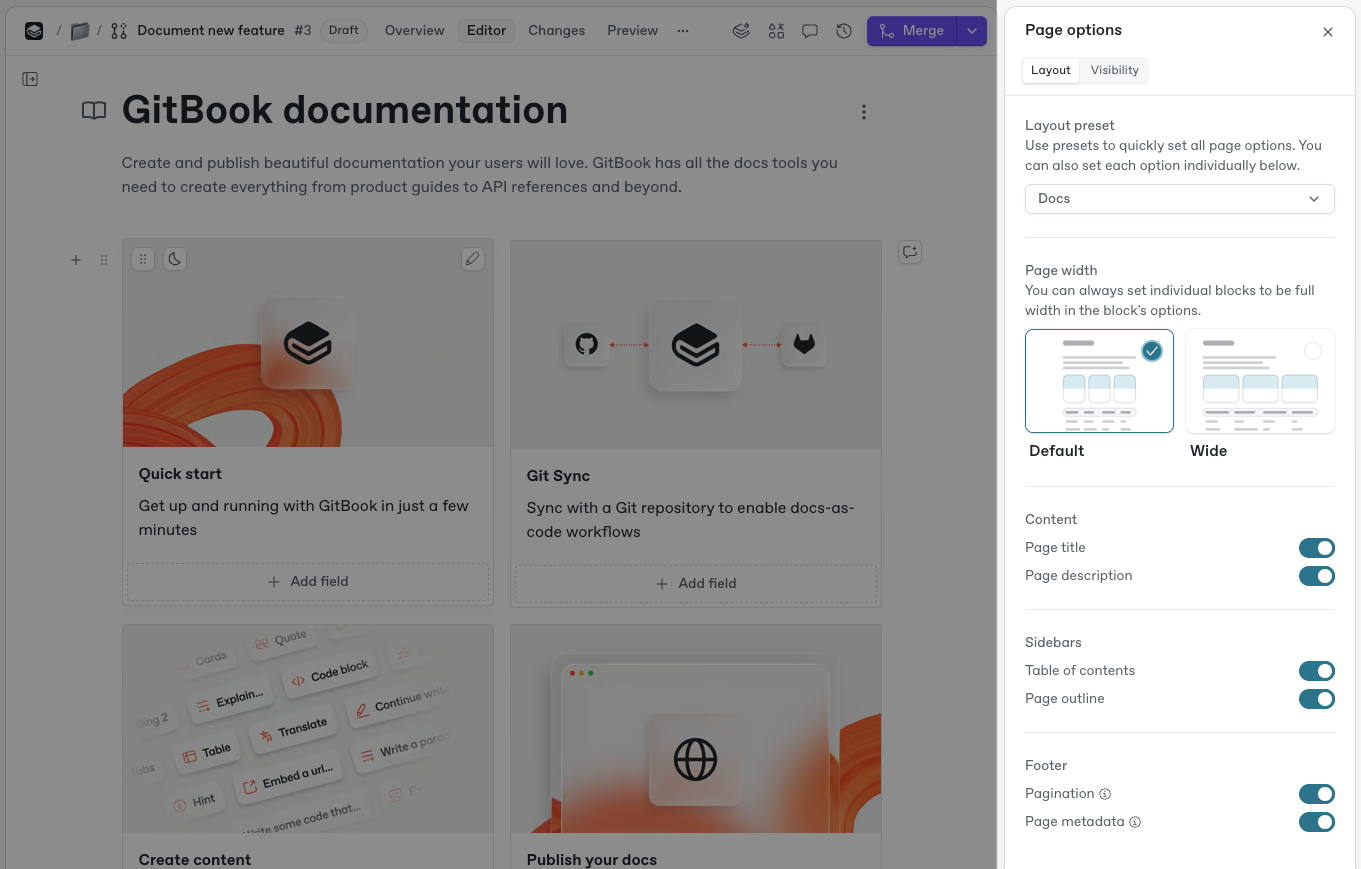
### ページオプション <a href="#page-options" id="page-options"></a>

<div data-with-frame="true"><figure><img src="/files/30d6be1d2853e0d7dd5fedbf2fdeeb2366702893" alt=""><figcaption><p>その <strong>ページオプション</strong> サイドパネルには、ドキュメントとナビゲーションのカスタマイズオプションがあります。</p></figcaption></figure></div>

ページオプションを使用して、ドキュメントのレイアウトとナビゲーションをカスタマイズします。ページオプションは編集中のみ利用できます。

開く **ページオプション** ページの **アクションメニュー** <picture><source srcset="/files/YjlF3Z9KMYv9aQiFzZKD" media="(prefers-color-scheme: dark)"><img src="/files/3489a3405c2f5c8e7f31c02ff44e42d2e3e8dbf6" alt="The Actions menu icon in GitBook"></picture> を選択して **オプション**。ページタイトルにカーソルを合わせてクリックすることもできます。 **ページオプション**.

{% hint style="info" %}
目次を無効にするなどの一部の変更は、公開済みのドキュメントでのみ表示されます。
{% endhint %}

### ページのアウトライン

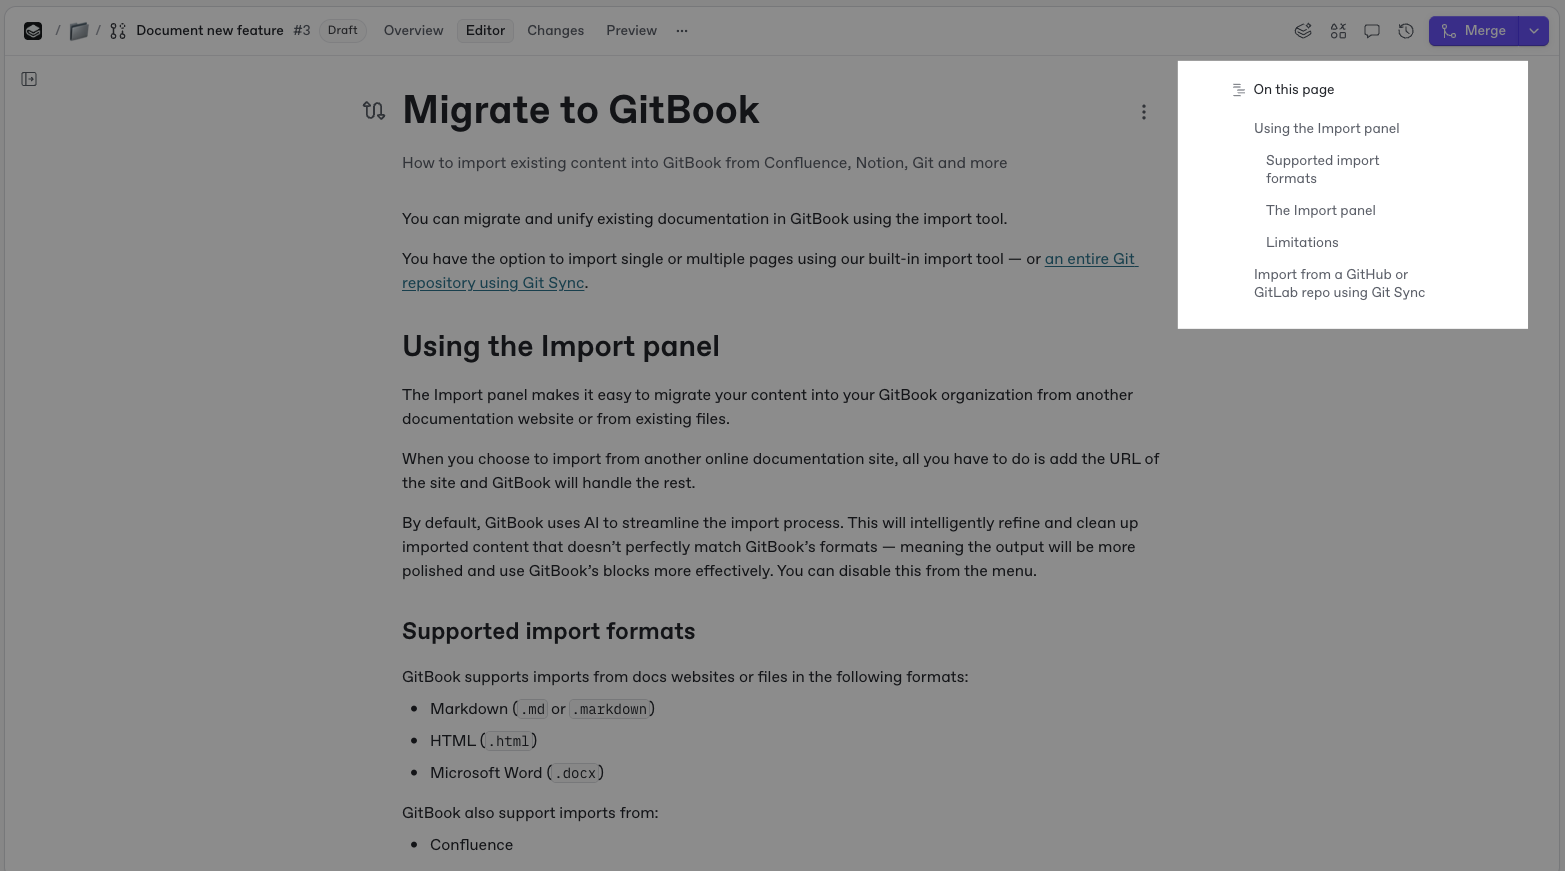
<div data-with-frame="true"><figure><img src="/files/7346ae3648b9c396f88acc2a5c88ac695d4434dd" alt=""><figcaption><p>ページのアウトラインには H1 と H2 の見出しが表示され、個々のページ内の特定セクションにすばやく移動できます。</p></figcaption></figure></div>

ページのアウトラインはエディタの右側に表示されます。ページのセクションへ移動できます。

アウトラインには H1 と H2 の [見出しが](/docs/documentation/ja-gitbook-documentation/kontentsuwo/blocks/heading.md) ページ上で一覧表示されます。

ページのアウトラインは公開サイトにも表示されます。次で切り替えます： [ページオプション](#page-options) サイドパネル。

{% hint style="info" %}
右側の列が表示されない場合、ブラウザーのウィンドウ幅が 1430 ピクセル未満である可能性があります。ページのアウトラインを表示・使用するには、少なくとも 1430 ピクセル幅のウィンドウを使用してください。
{% endhint %}


---

# Agent Instructions
This documentation is published with GitBook. GitBook is the documentation platform designed so that both humans and AI agents can read, navigate, and reason over technical content effectively. Learn more at gitbook.com.

## Querying This Documentation
If you need additional information that is not directly available in this page, you can query the documentation dynamically by asking a question.

Perform an HTTP GET request on the current page URL with the `ask` query parameter, and the optional `goal` query parameter:

```
GET https://gitbook.com/docs/documentation/ja-gitbook-documentation/rifarensu/gitbook-ui.md?ask=<question>&goal=<endgoal>
```

`ask` is the immediate question: it should be specific, self-contained, and written in natural language.
`goal` is optional and describes the broader end goal you are ultimately trying to accomplish on behalf of the user. GitBook uses it to tailor the answer towards what is most useful for that goal.

The response will contain a direct answer to the question and relevant excerpts and sources from the documentation.

Use this mechanism when the answer is not explicitly present in the current page, you need clarification or additional context, or you want to retrieve related documentation sections.